We test a lot of different bikes here at Flow, and that means we spend a load of time setting up suspension and tweaking it out on the trail. In our experience, suspension setup is worth getting right. It can totally transform how a bike rides, with small changes in pressure and damping having a noticeable impact on your overall comfort and control.
When it comes to a modern suspension fork, there’s a lot of potential to be tapped into. Skip over some of the setup details however, and the reality is that you’re not going to have the best experience no matter how much Kashima or how many colourful dials your fancy fork has.
To help get you started, we’ve put together a list of tips and suggestions on what to consider when setting up your air-sprung fork. This guide is designed to be applicable whether you’ve got a 130mm travel Fox 34 Rhythm fork on an entry-level trail bike, or a Factory Series Fox 38 on a premium big travel e-MTB. And while we’re using Fox suspension forks as the primary example here, many of the same tuning tips will apply to RockShox and other brand’s forks too.

Get a digital shock pump
First things first. You’ve got a $1,000 fork but you’re still using a crummy shock pump that your mate lent you eight years ago? Get your act together! Return that shock pump, buy a good quality replacement, and make sure it’s digital.
Why digital? Compared to an analogue version, a digital shock pump makes it much easier to make smaller and more accurate changes in pressure. As well as being easier to read in the first place, some digital pumps will let you make adjustments in 0.5 psi increments.
This might sound like overkill, but it’s actually quite important for modern trail and enduro forks that use high volume air springs. Because these operate at lower pressures to begin with (compared to a small volume air shock, for example), changes of 2-3 psi will make a noticeable difference. A difference that you’ll pick up on whether you’re a pro rider or a beginner.
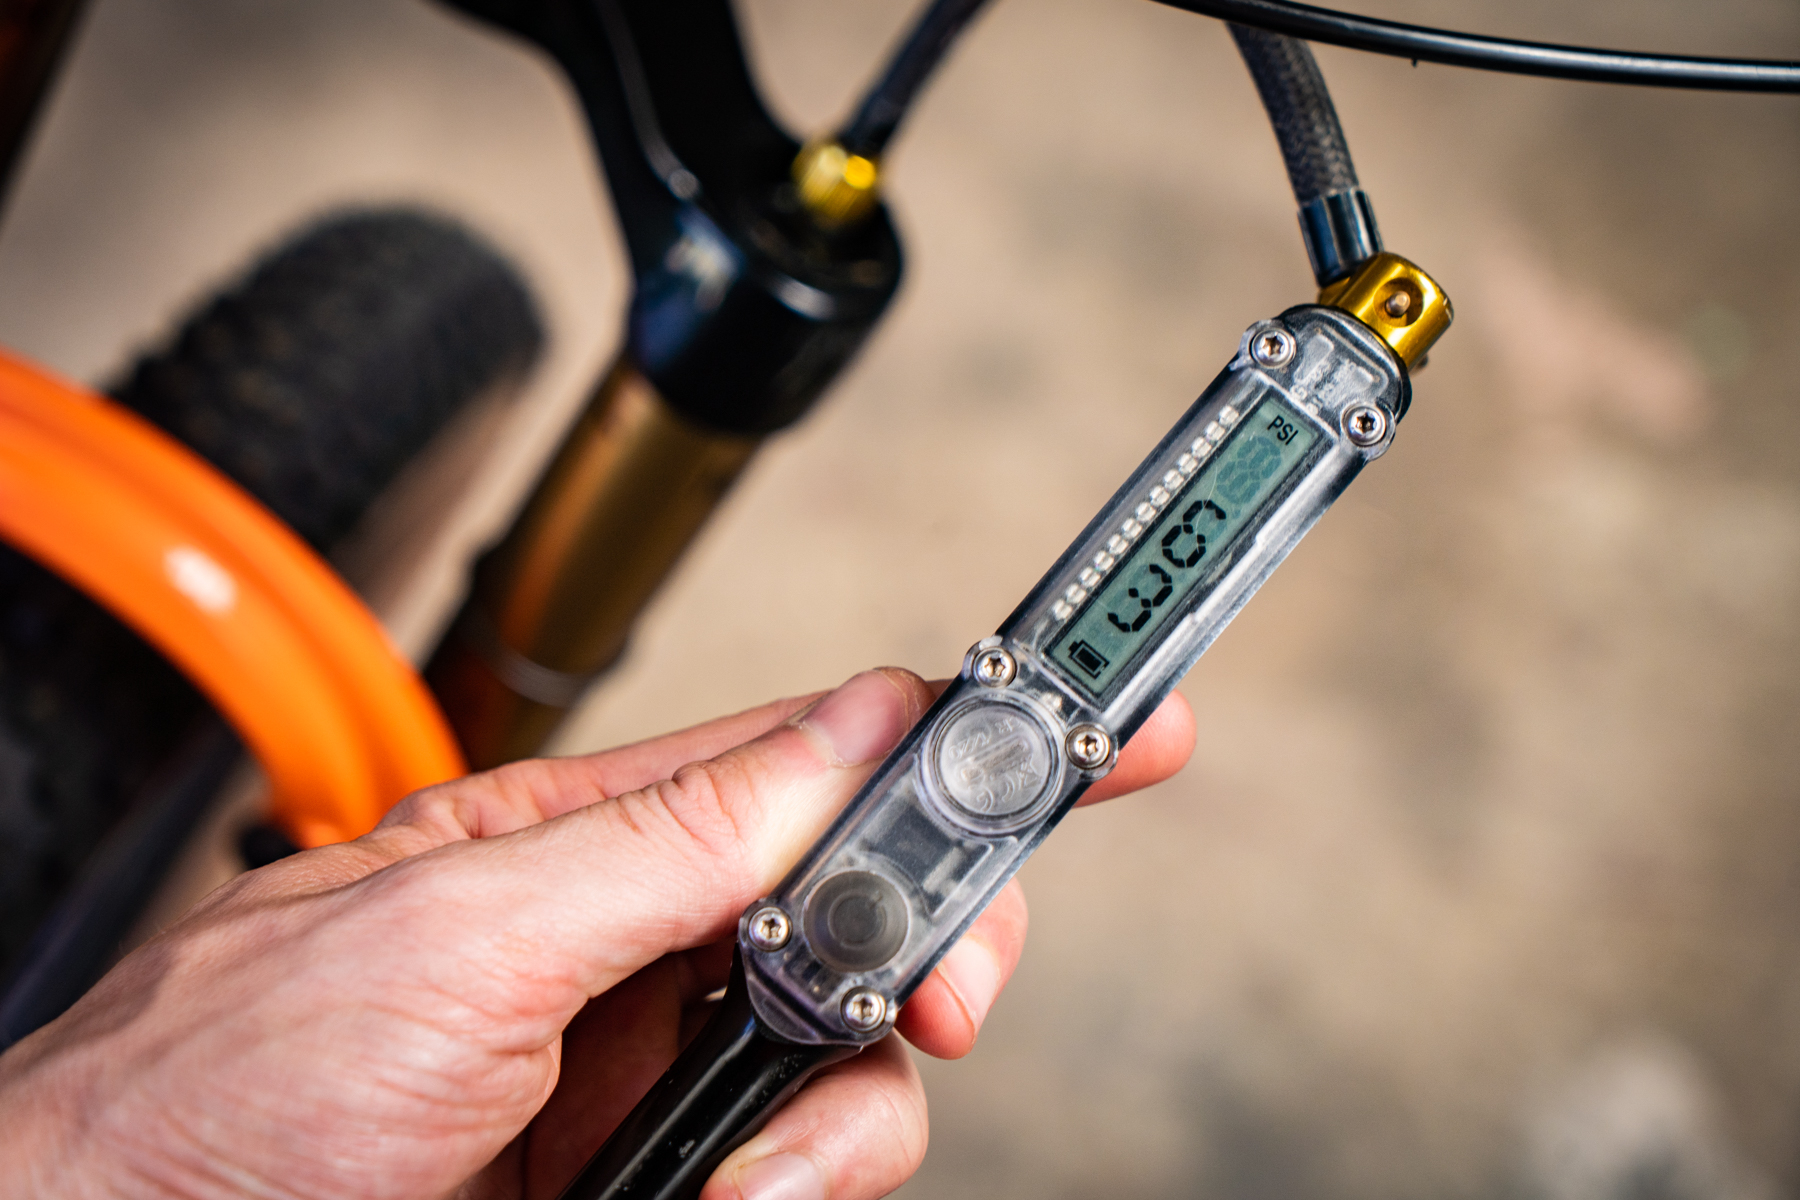
One other important note on shock pumps. When you thread the pump onto your fork’s air valve, a small amount of pressure will be released from the fork and into the pump. This is totally normal. However, it does mean that the initial pressure reading on the pump will be a few psi lower than what was actually inside the fork. As such, it’s only important to read the pressure after you’ve finished making an adjustment and are about to remove the pump.
When you do remove the shock pump, you’ll hear a small hiss of air being released. This is not air escaping from the fork itself, but rather a small amount of air being released from the pump. Again this is totally normal, don’t freak out!
Open all the adjusters
Before checking air pressure and sag, you’ll want to ensure that all of the damping adjustments are in their lightest, most open setting.
This is all about helping you get a more accurate sag reading. Because if the rebound dial is on the slowest setting, or the compression lever is set to the firmest position, it’ll add unnecessary resistance and make it harder for the fork to settle into its sag.
Simply wind all of the adjusters anti-clockwise until they stop. The rebound speed should be pogo-stick fast, and the compression damping should feel nice and light.
Count those clicks
While you’re playing around with the damping adjusters, now is the perfect opportunity to count the number of clicks for each dial. This is a good way to know what the total range of each adjuster is, and it’ll help you out with tuning later on.
Note down the total number of clicks for each adjuster, then back them off anti-clockwise again to their lightest setting.

Equalising the air chambers
Before attaching the shock pump to your fork, it’s important to understand how a modern air spring works because it pertains to one crucial step during the setup procedure.
The latest EVOL air spring in a Fox fork actually has two separate chambers. There’s a positive and a negative air chamber, separated by the main seal head. When you add air through the valve at the top of the fork, you’re increasing the pressure inside the positive air chamber. However, the two chambers are designed to self-equalise. This occurs when the fork is compressed and the main seal head passes over a small notch in the stanchion that is known as the ‘transfer port’.
To get the two chambers to equalise in pressure, slowly compress the fork to around 10-20mm into its travel. You should hear a hiss from inside, which is the air rushing from the positive chamber into the negative chamber via the transfer port.
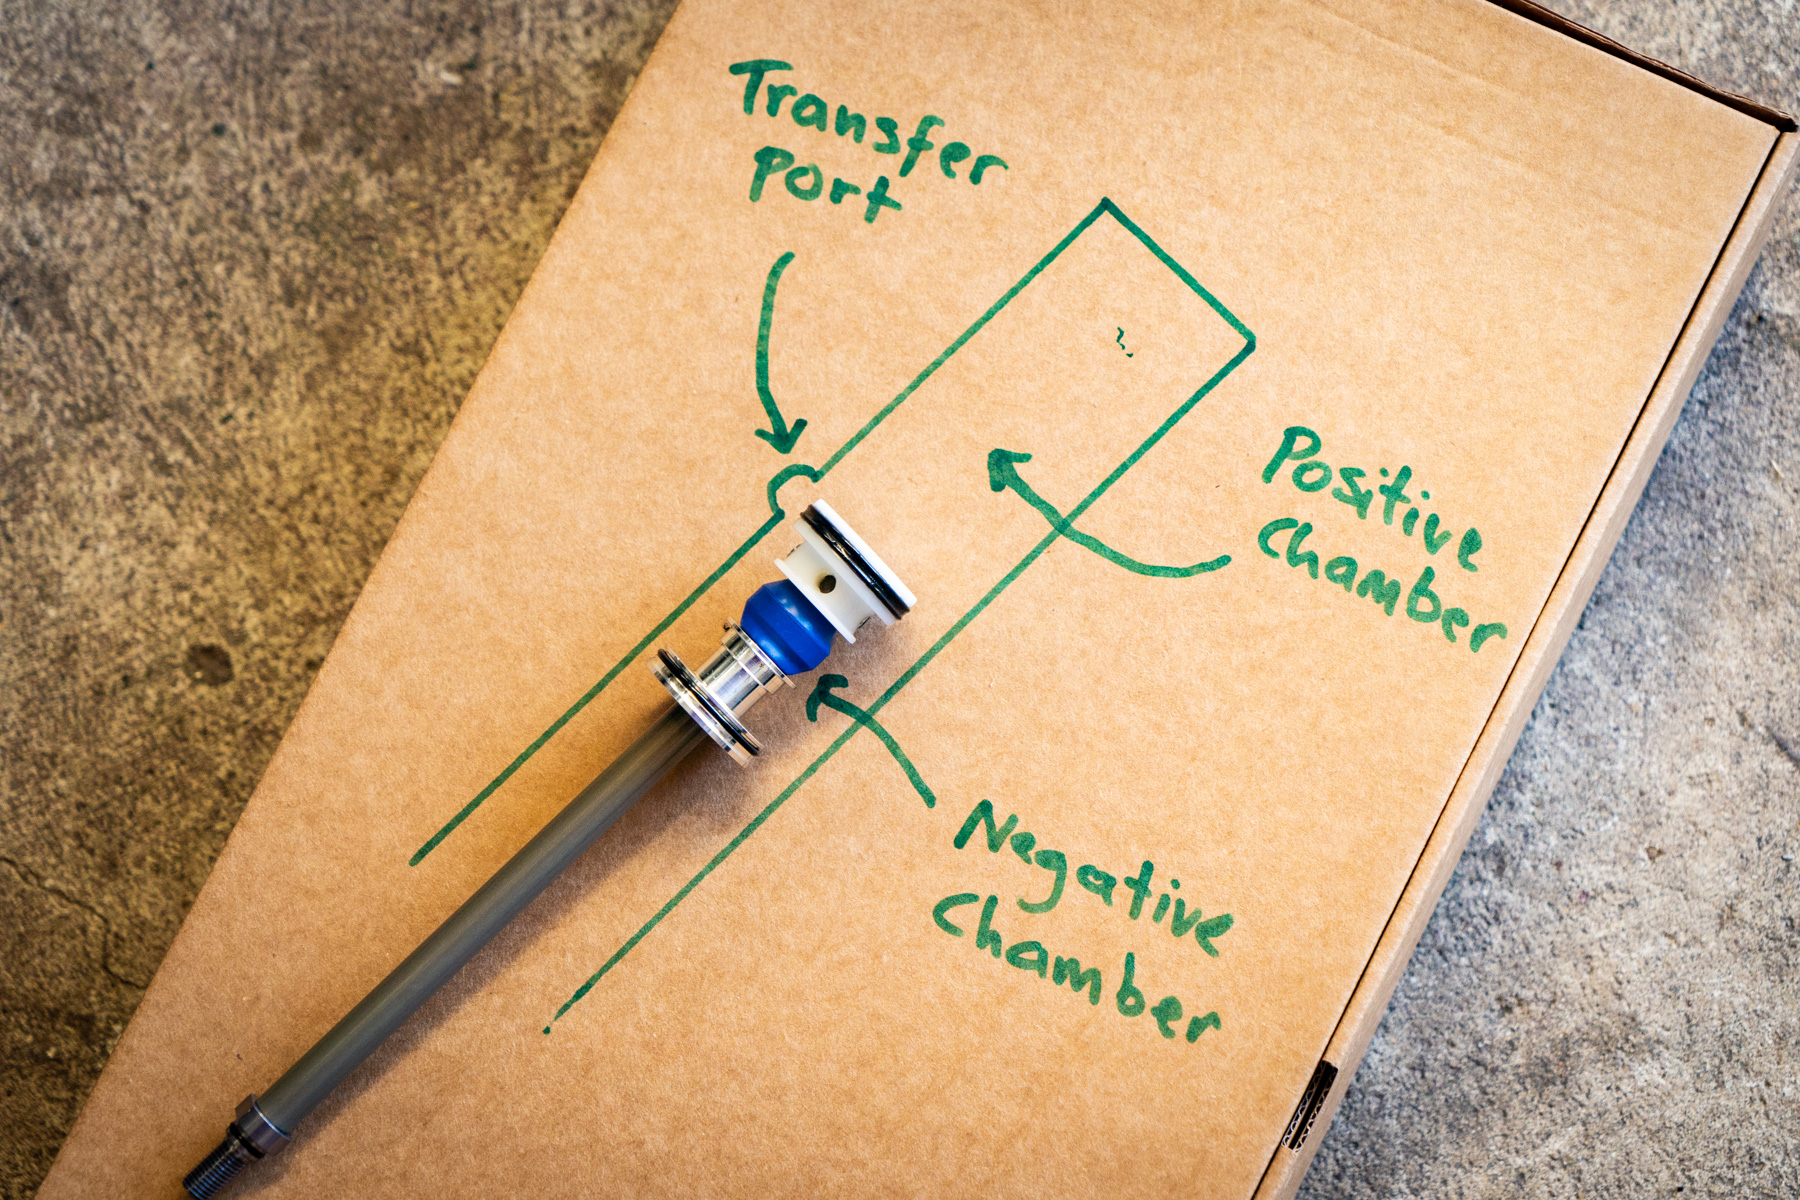
During this process, the pressure in the positive chamber will drop slightly. Because of this, you’ll want to ensure that you are properly equalising the air spring when making any air pressure adjustments. Slowly cycle the fork a few times around that 10-20mm mark to equalise the chambers, then recheck the gauge on your shock pump to make sure you’re getting an accurate reading.
Dialling in air pressure
Now we know how to equalise the air chambers, it’s time to move onto dialling in pressure. This is also known as the ‘spring rate’ of your fork.
It’s important to note here that the correct pressure is dependent on a variety of factors. Rider weight is the primary one, though the amount of pressure you need is also determined by the fork’s travel, stanchion size, the damper, and even the bike it’s fitted to. Riding style and terrain will also influence your ideal spring rate.
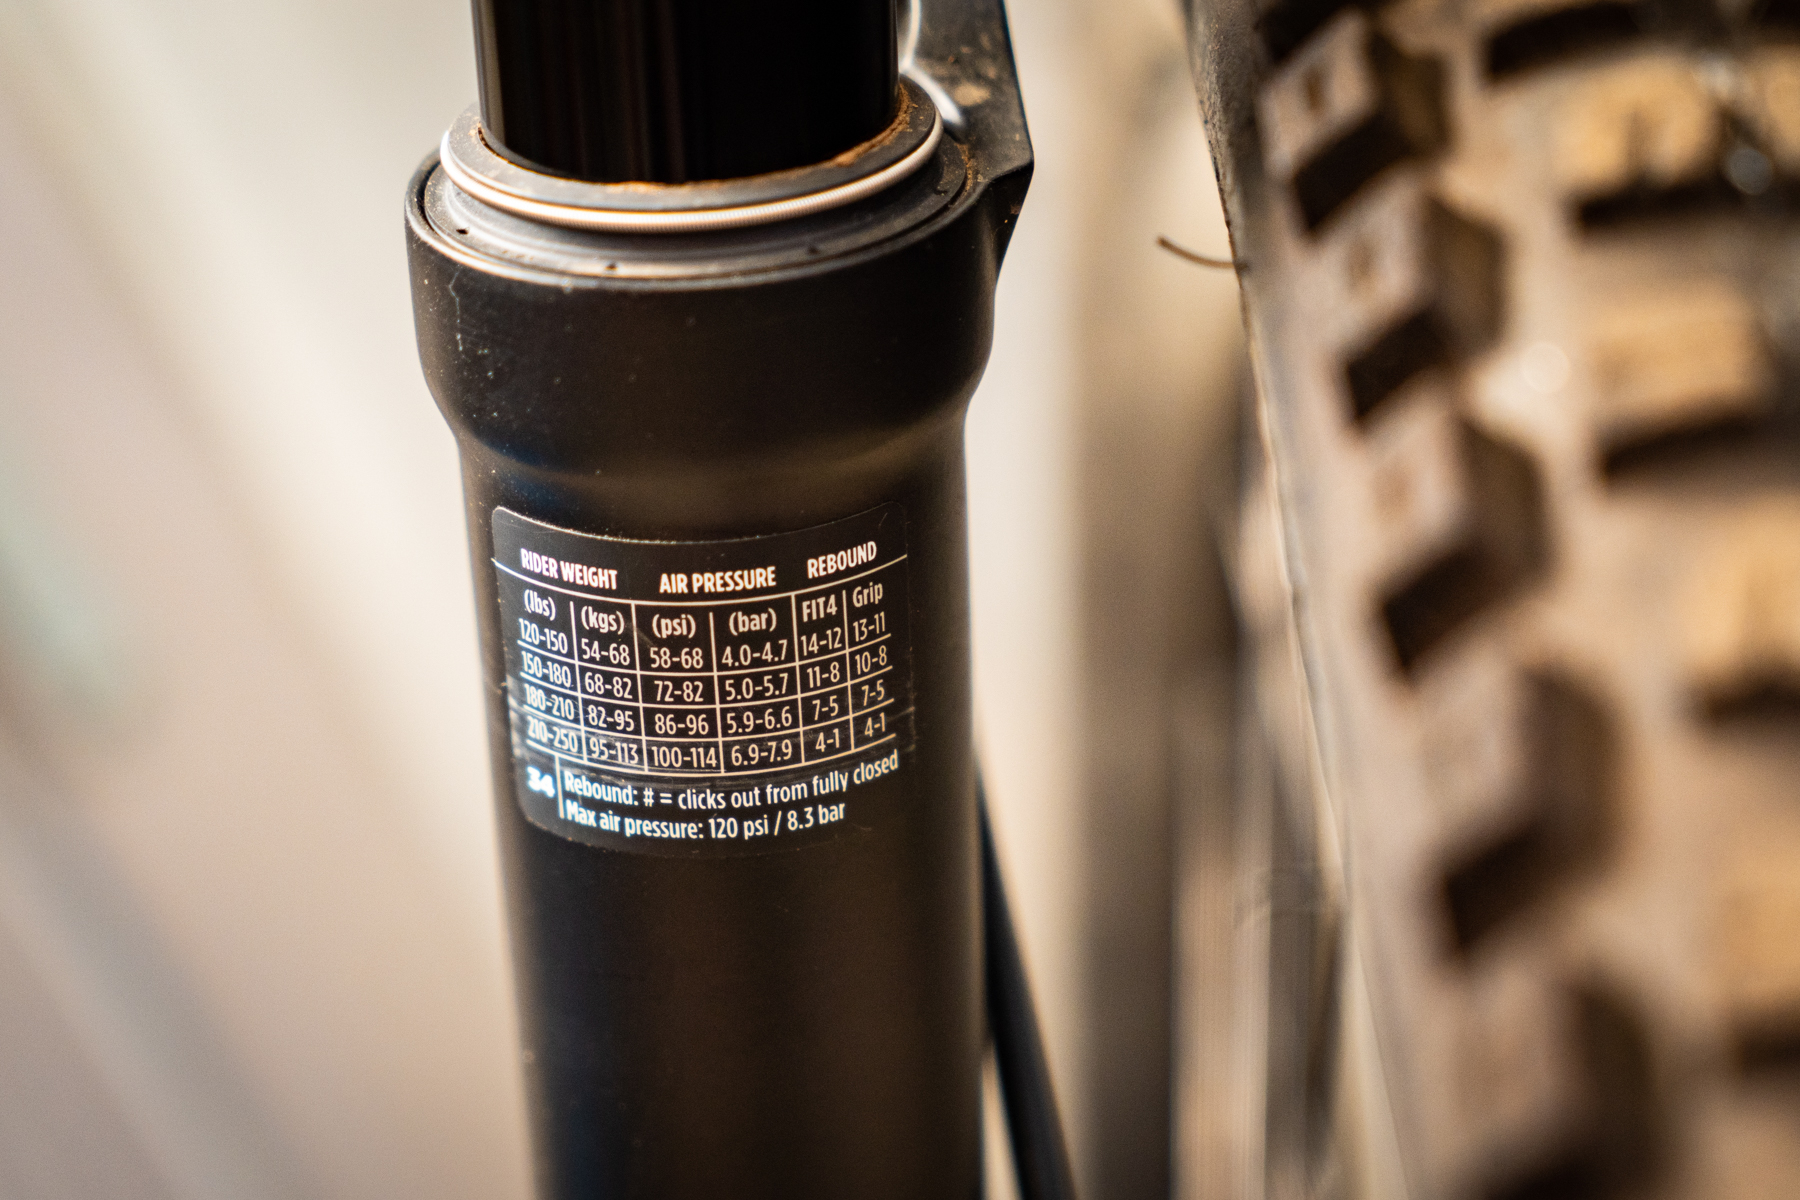
To get started, we’d recommend following the setup guide on the back of the fork lowers. Weigh yourself with your riding gear (shoes, clothing, helmet and a pack if you wear one), and see what pressure is recommended for that weight on the chart.
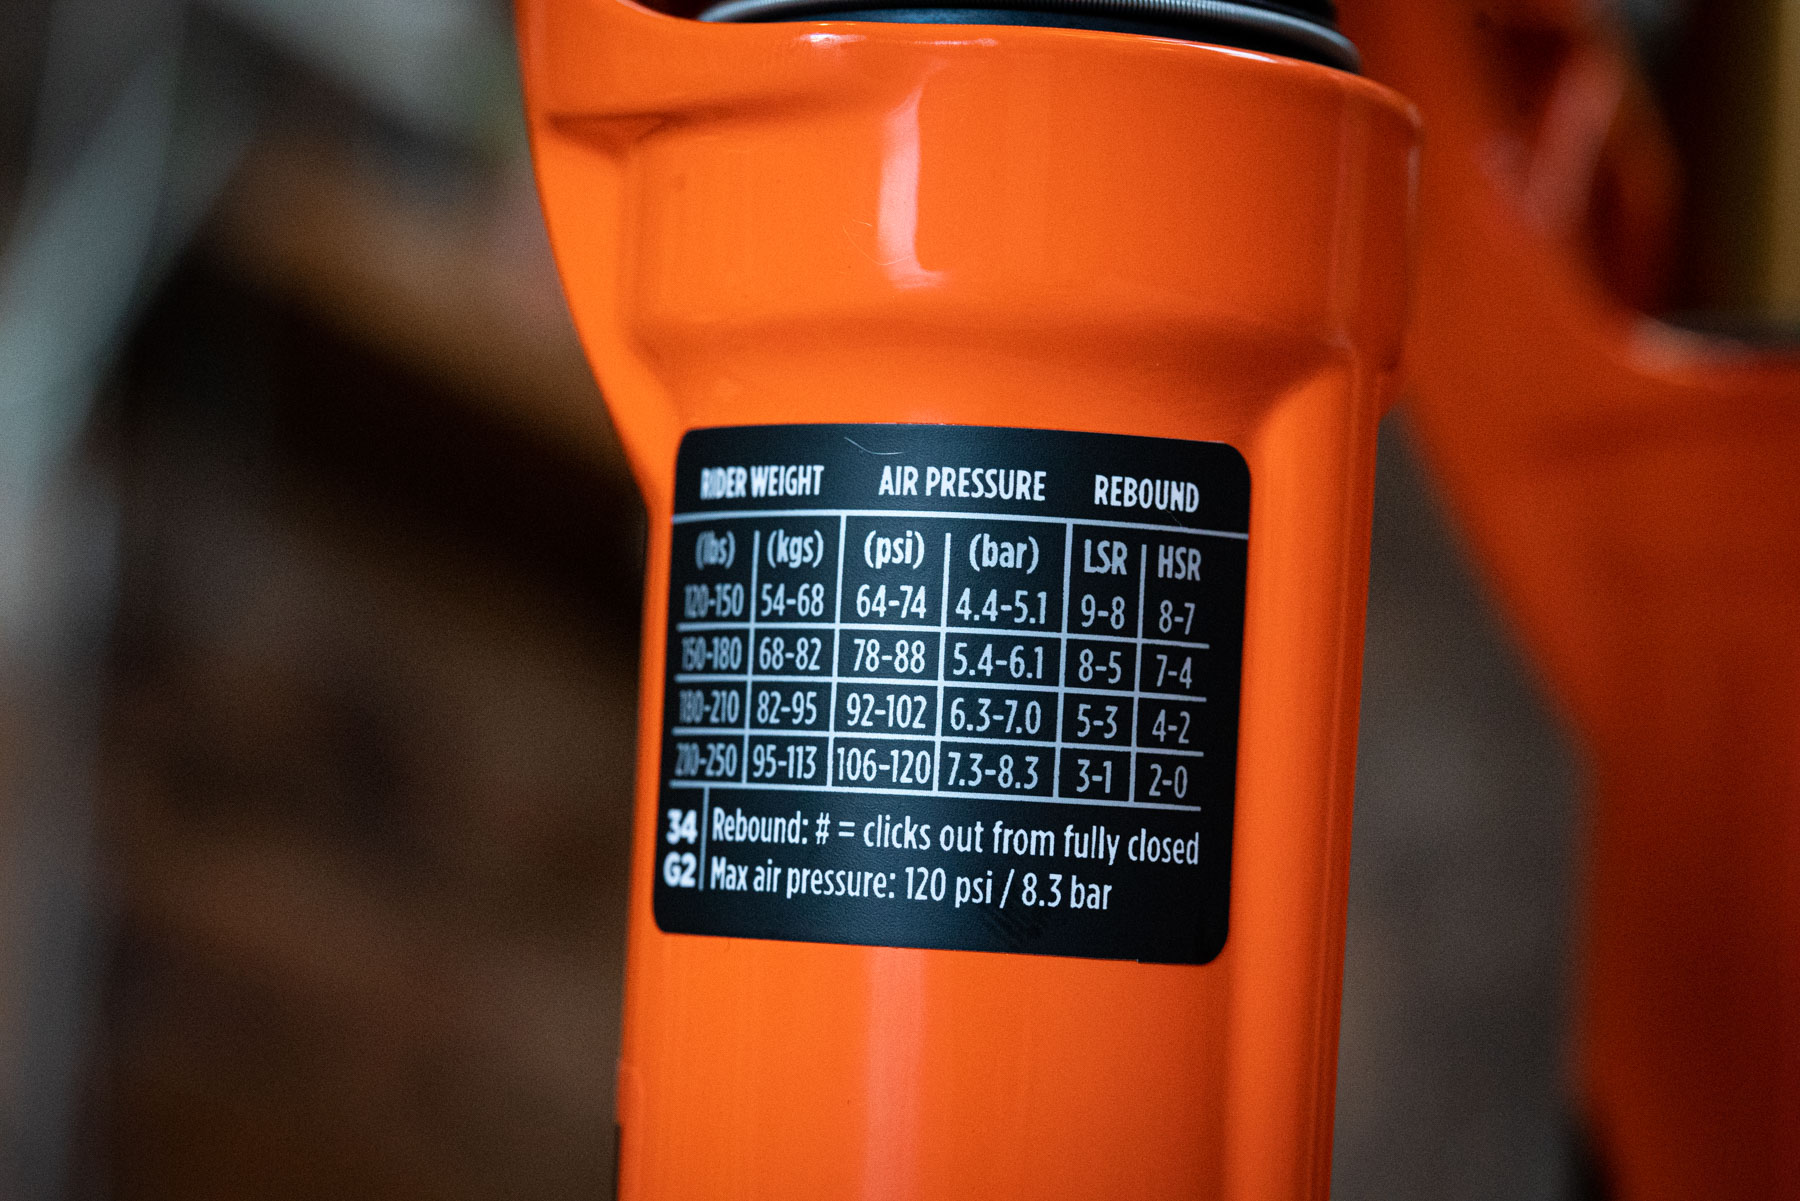
Inflate the air spring with your snazzy digital shock pump, and be sure to equalise the air chambers by slowly cycling the fork around that 10-20mm mark. Leave the shock pump attached during this process.
When checking the pressure reading, it’s also important to lift the front wheel off the ground. This is to ensure that the fork isn’t artificially weighted by the bike and causing a higher pressure reading. It’s particularly important with an e-MTB, which is considerably heavier than a normal mountain bike and will actually cause the suspension to sag under the bike’s own weight.
Checking sag
While we’d recommend basing your air pressure on the setup chart, sag can also be a useful guide when setting up your fork.
Sag refers to how much the suspension compresses when you’re sitting stationary on the bike on flat ground. According to Fox, you want to set the sag between 15-20% of the available travel. So if you have a 160mm travel fork, you’ll be aiming for as little as 24mm sag for a firm setup, and as much as 32mm of sag for a plush setup.
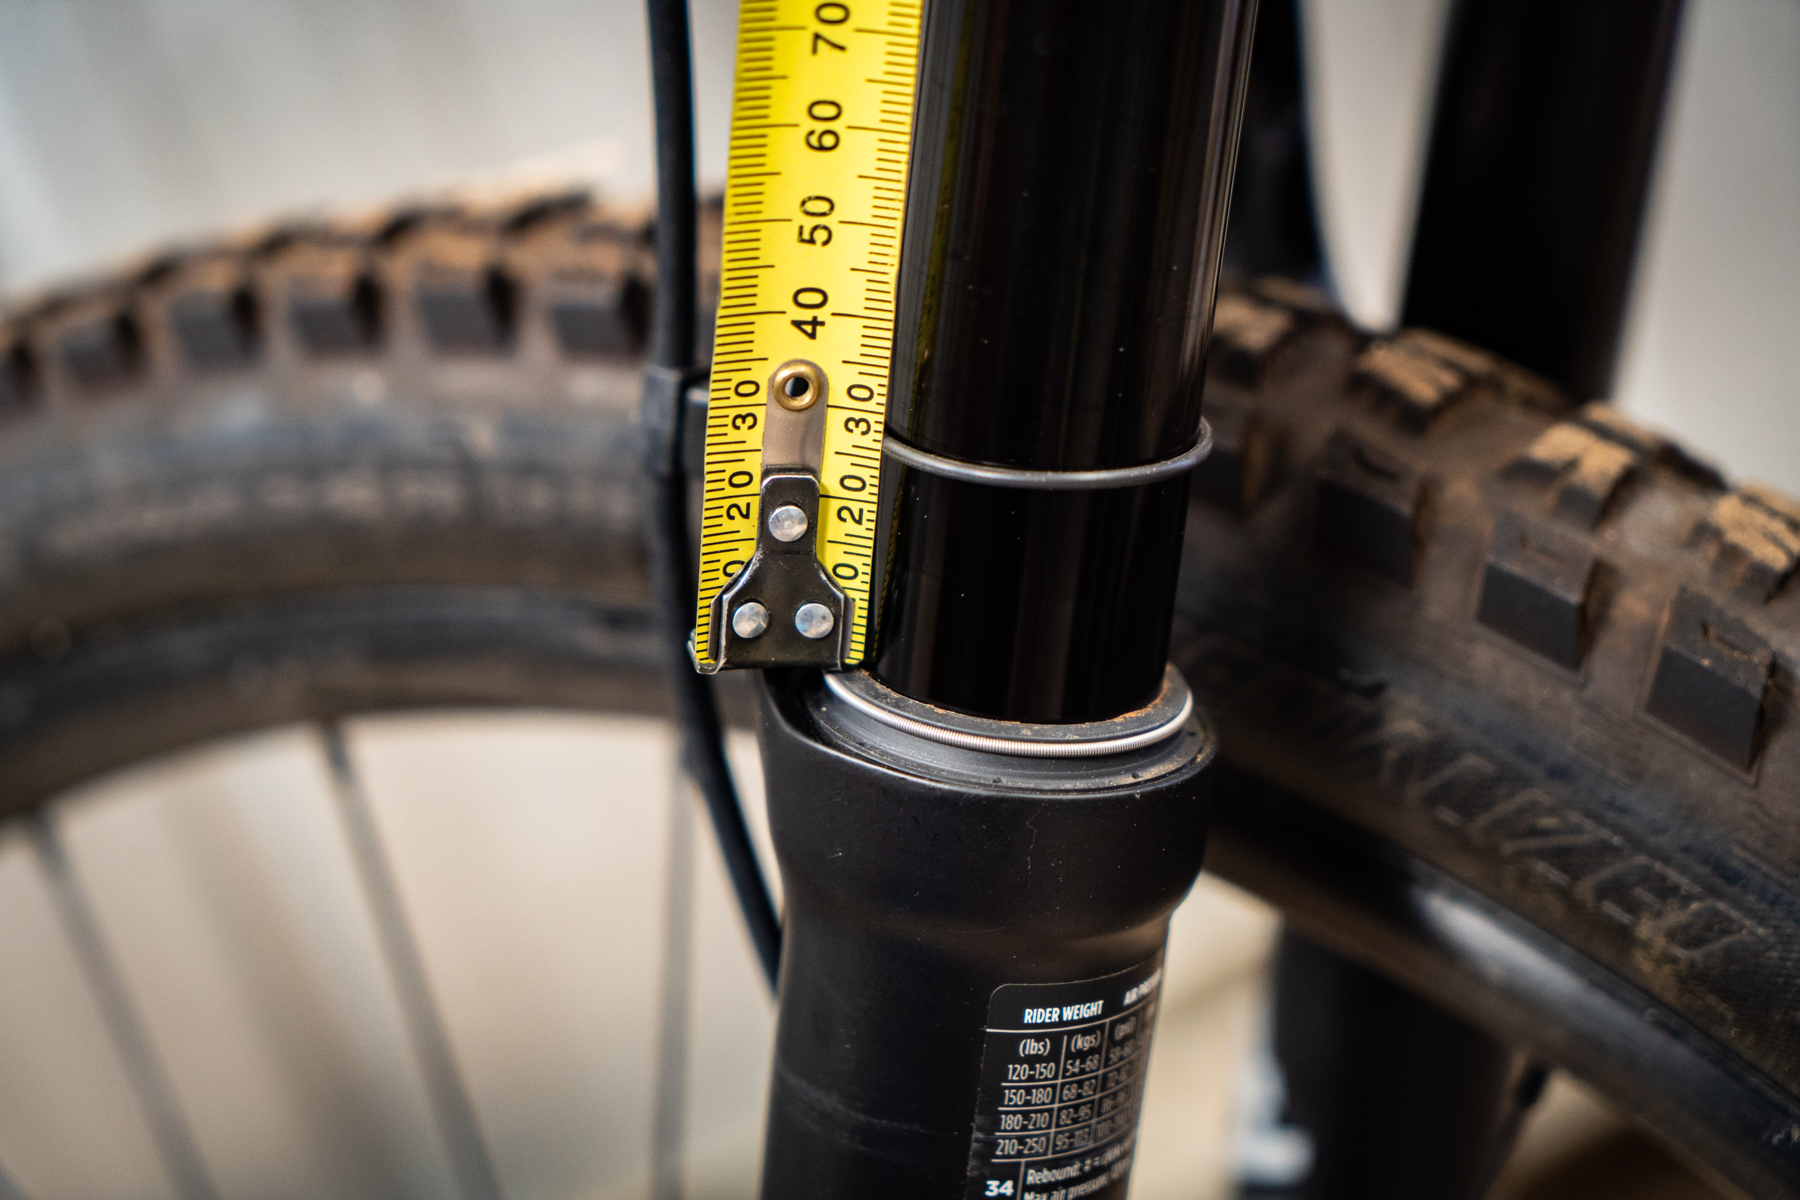
It’s important to acknowledge that measuring sag on a fork is trickier compared to a rear shock. This is because modern mountain bikes have slack head angles, which makes it harder to compress the fork smoothly when you’re on a flat surface. And the slacker the head angle, the more stiction there will be. Additionally, new forks have tight-fitting seals that will take some time to bed in. As such, it’s a good idea to recheck your sag after the first few rides on a new fork.
For greater accuracy when checking fork sag, get a friend to help you out. While you’re sitting on the bike in your riding gear, get them to stand in front of you with their legs gripping the front wheel, and their hands holding onto the handlebar. They’ll need to hold the front wheel tight in order to balance you.

Next, stand up on the pedals and assume the attack position, with your knees and elbows bent and your weight positioned in the middle of the bike. Bounce on the fork a few times, as if you’re preloading into a jump. This will help to break through any seal stiction in the fork. On the last bounce, return back to the attack position and stay still to let the fork settle.
Have your pal push the fork’s O-ring down onto the wiper seal, then slowly dismount the bike so as to not push the O-ring from its position. Next lift the front wheel off the ground to ensure the fork has properly extended, and measure the distance between the wiper seal and the O-ring. This is your sag measurement.
While this will get you in the right zone, the aforementioned difficulty of measuring sag on a bike with a slack head angle means you won’t necessarily want to take this number as gospel. So while it handy to know what your sag is, basing your setup on air pressure is more useful when it comes to really dialling in your fork.

Volume spacers
Once you’ve got air pressure and sag set, it’s time to get an idea of whether you need to make any adjustments to the spring volume.
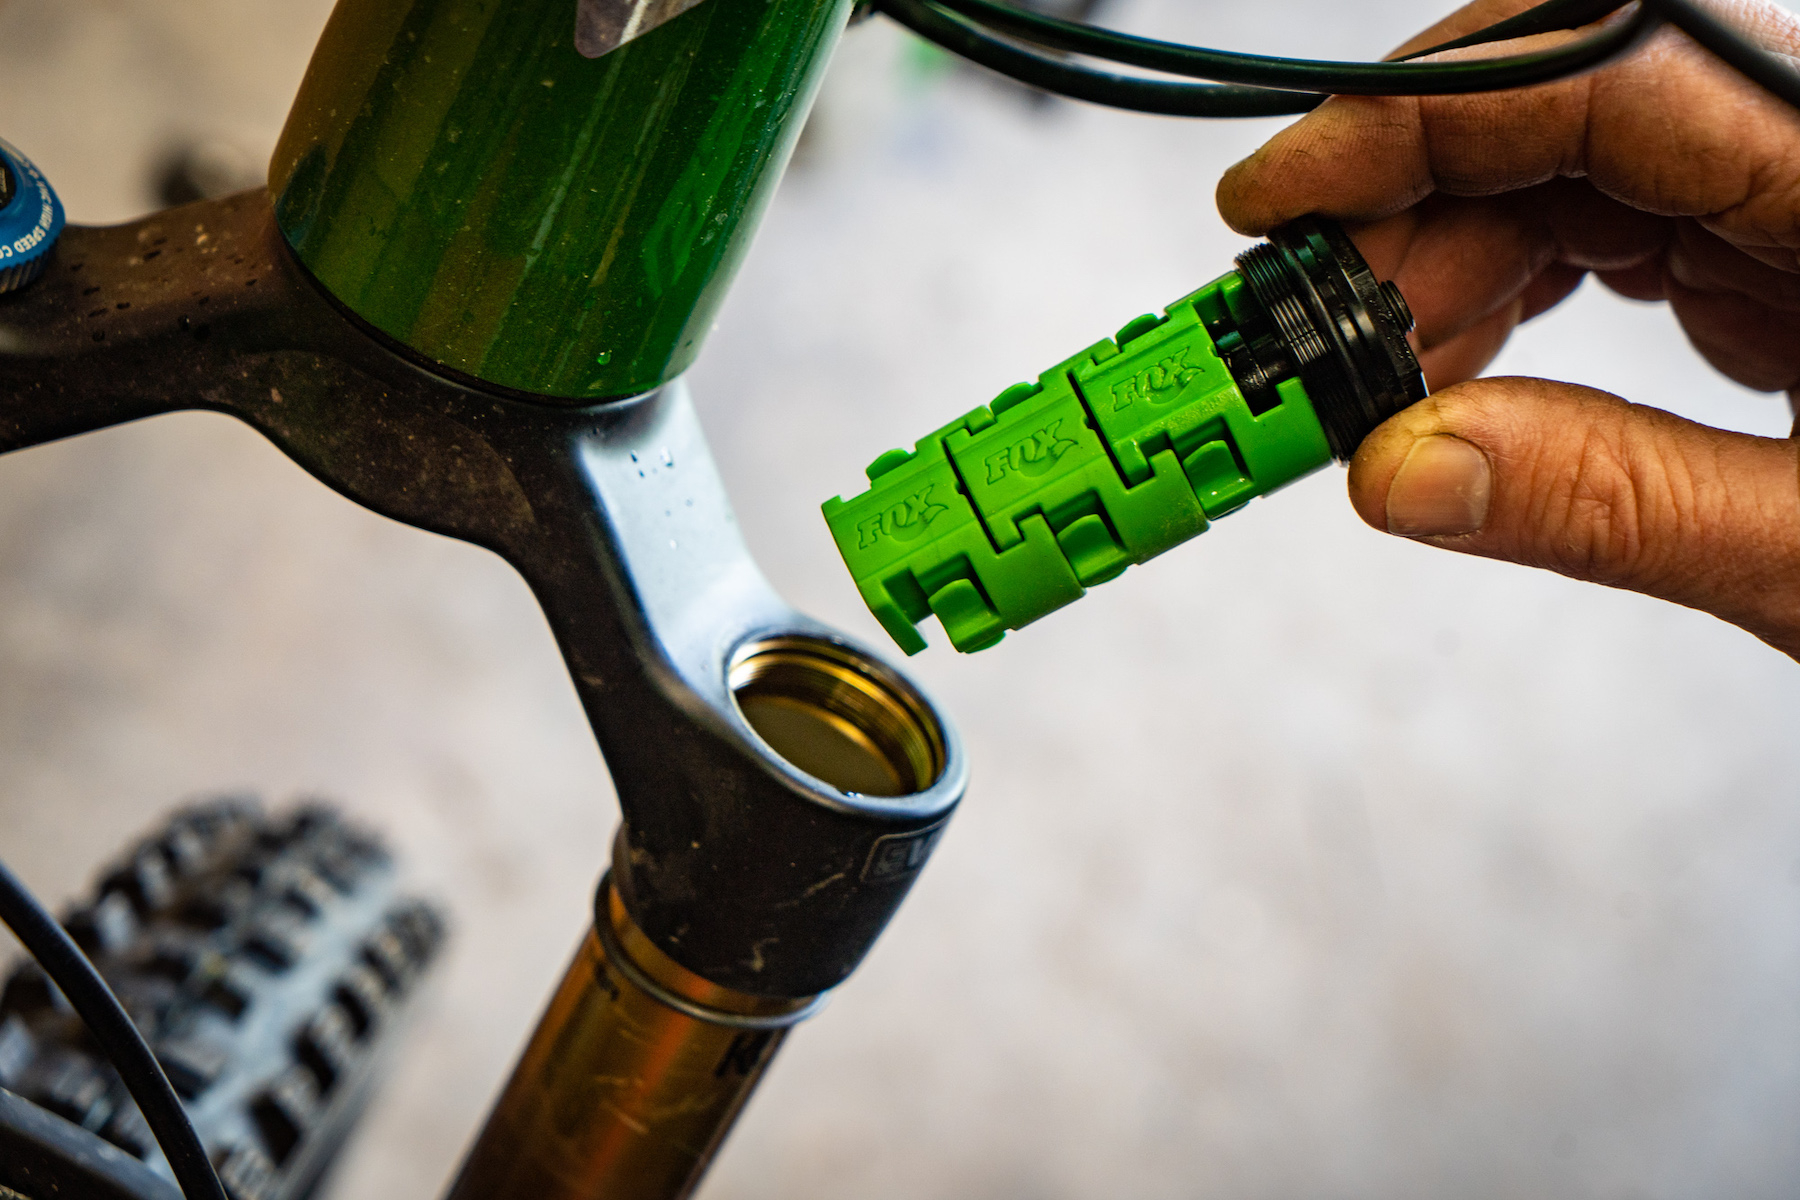
Most Fox forks will come with one or several plastic volume spacers inside the air spring. These plastic spacers are designed to reduce the available air volume, changing the behaviour of the suspension in the latter part of the travel.
It’s important to note that Fox produces different coloured spacers to fit various fork models, so you’ll need to first clarify which type you need for your fork. There is also a limit to how many volume spacers you can fit inside the air spring of each fork. Check the technical manuals section of the Fox website for further info.

Adding more volume spacers will make the fork more progressive. You’ll feel it becoming firmer in the latter part of the travel, and it will be more resistant to bottoming out.
Less volume spacers will make the fork more linear. The suspension will feel softer and more active in the latter part of the travel, though it’ll be less resistant to bottoming out.
All else being equal, a heavier rider will typically require more volume spacers, whereas a lighter rider will need fewer volume spacers. Riding style and terrain come into it too, which means there’s no hard rule on how many you should be using. Thankfully there’s a relatively simple way to find out if you’re in the ballpark before even hitting the trails.
You want a flat area, either in your backyard, on the road or even a carpark. Push the fork’s O-ring down to the wiper seal, then mount the bike and slowly coast along with your limbs at full extension. Next, use your entire bodyweight to push down into the suspension with as much force as possible, without the wheels leaving the ground. Do this a couple of times, bouncing on the suspension as hard as you can.
Dismount the bike and take a look at the position of the O-ring. If the O-ring is up around 80% of the travel, you’re in the right zone. If you’re noticeably under that though, you may need to remove a volume spacer. If the O-ring is higher, or perhaps you even bottomed out the fork, then you’ll need to add a volume spacer.
Whenever you add or subtract volume spacers, inflate the air spring back up to your previous sag and pressure settings. This is because changing volume spacers mostly affects the latter part of the travel, so the same pressure should result in a similar amount of sag as before. Keeping the pressure the same will also help you isolate how the change in volume has impacted the fork’s behaviour.
From here, keep an eye on that O-ring to see how much travel you’re using throughout each ride. Assuming you’re hitting a few drops and hard hits along the way, you’ll want to be using close to full travel without bottoming out.
Rebound damping
After dialling in air pressure and volume, it’s time to turn to rebound.
Rebound damping is directly related to the spring rate. And the higher the air pressure, the slower the rebound damping will need to be in order to control the fork’s extension. This means that lighter riders will require a faster rebound setting, while heavier riders will need a slower rebound setting.
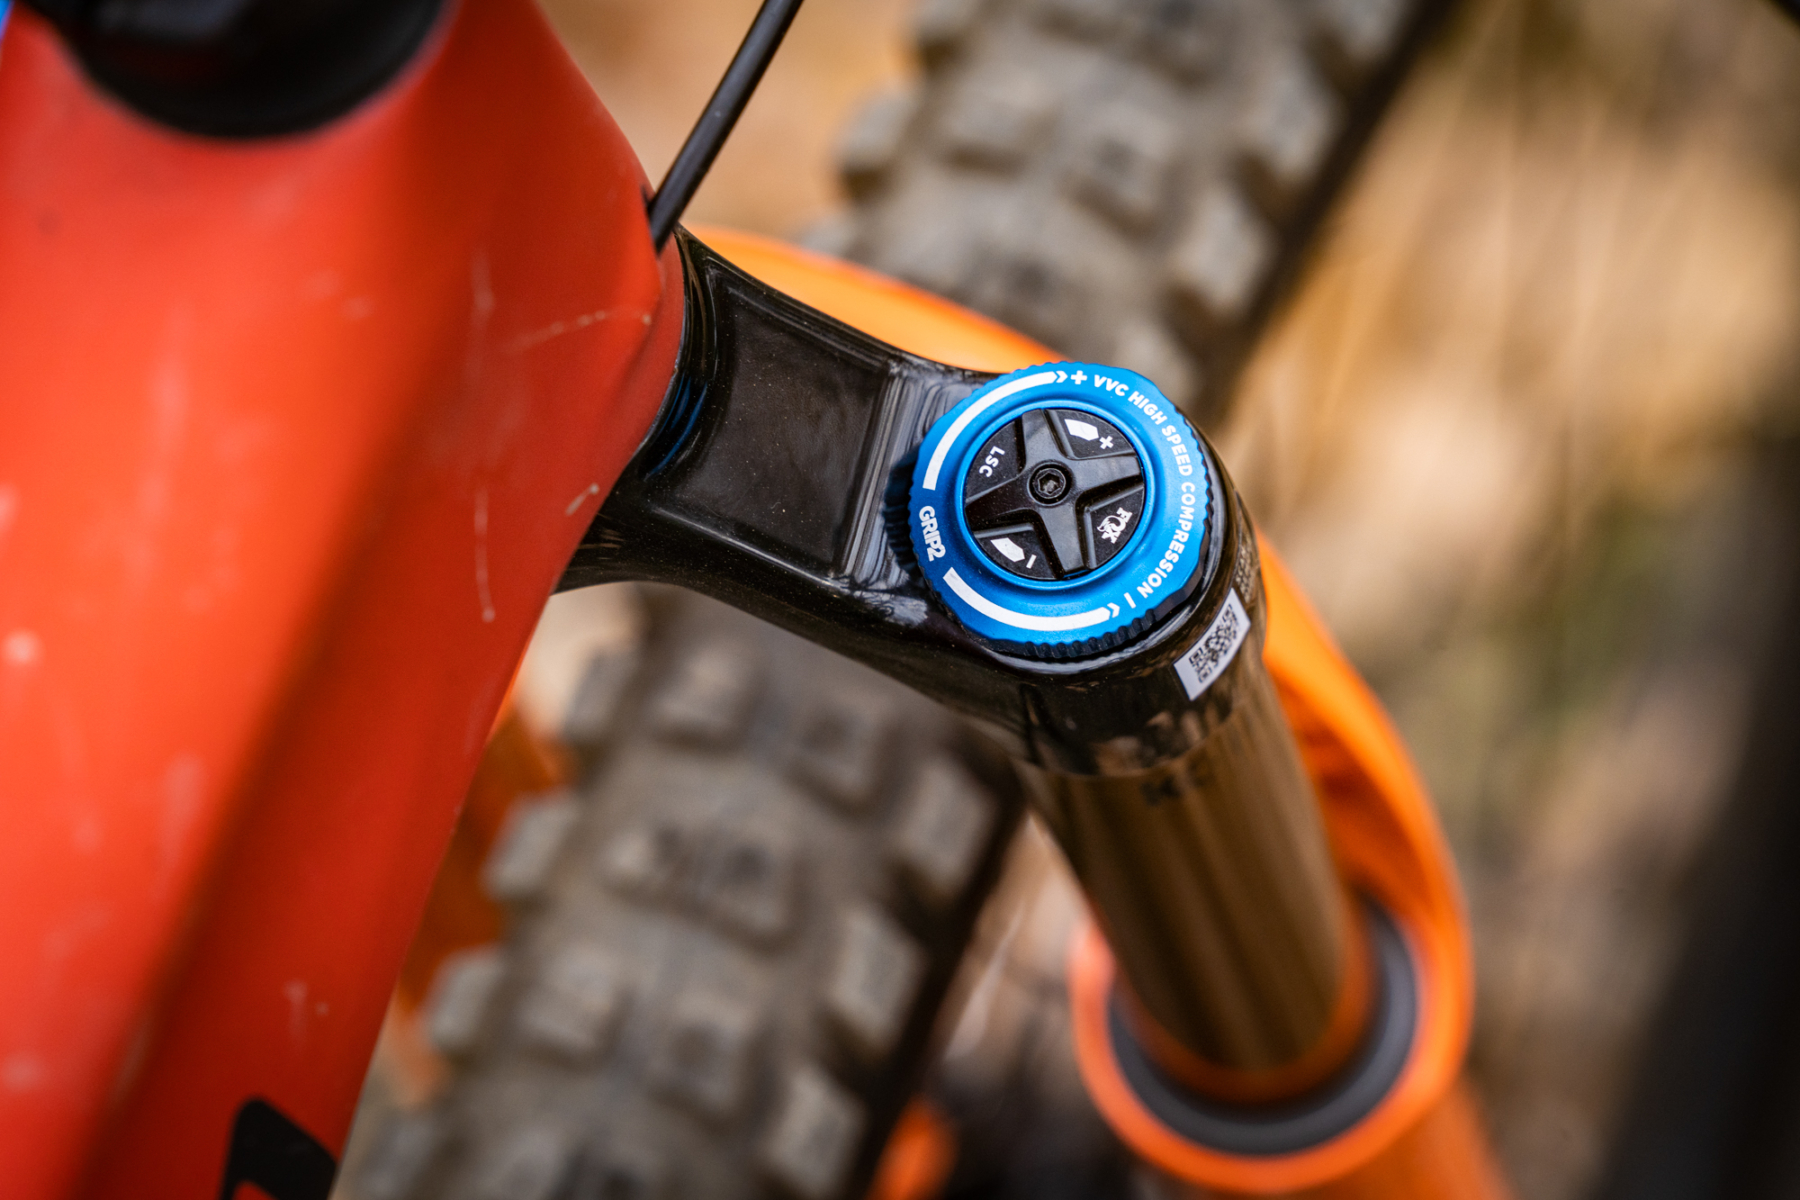
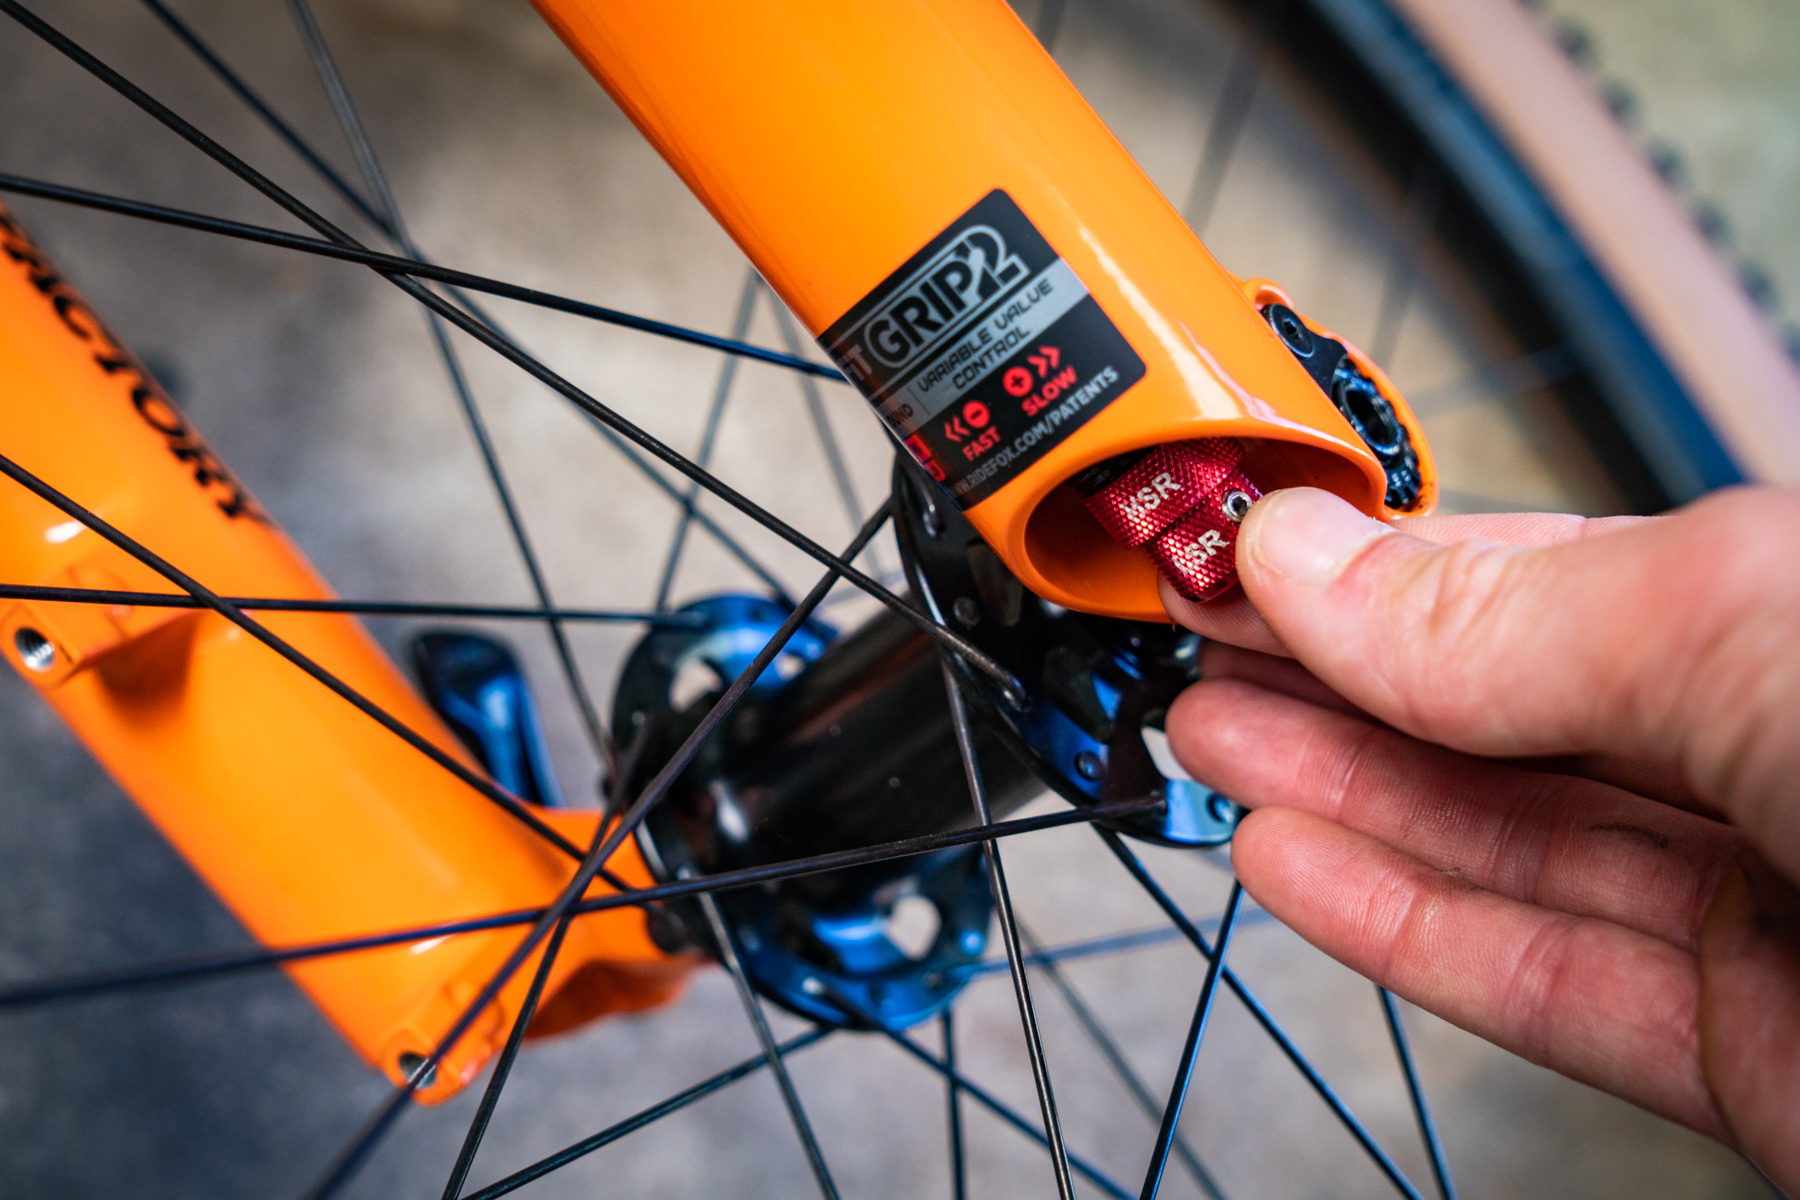
You adjust rebound damping via the red dial at the bottom of the right-hand fork leg. Fox forks with a GRIP or FIT4 damper will have a single red dial. Forks with a GRIP2 damper will have two red dials, which allows you to control both low and high speed rebound damping.
Whatever fork you own, it’s always a good idea to start at the recommended rebound setting based on the setup chart on the back of the fork lowers. This number will be based off the air pressure, and therefore your riding weight.
First, wind the rebound dial all the way clockwise until it stops. This ‘zero’ position is the slowest rebound setting. From here, wind the rebound dial anti-clockwise, counting the clicks as you go until you hit the recommended number. Note this number down, and how it relates to the total number of clicks on that dial. If you have a GRIP2 fork, repeat this procedure with the high speed rebound dial.
For most riders, the recommended pressure and rebound settings will likely work well. What you’re aiming for is to have the fork return quickly enough after an impact, without bouncing the front wheel off the ground and pushing back on you too forcefully.
To check this, stand next to the bike on a flat surface. Push the fork 25% into its travel, then release your hands from the grips as fast as possible. As you release your hands, pay attention to how the fork extends. You want it to return quickly, but the front tyre shouldn’t bounce off the ground. If it does, slow down the rebound damping one click.
For those with a GRIP2 fork damper, a similar process can be applied to the high-speed rebound dial. However, you’ll need to push the fork with more force and deeper into its travel in order to engage the high-speed circuit. Again, you’re looking for a quick return, without the front tyre bouncing off the ground.
Compression damping
While air pressure and rebound settings are largely determined by rider weight, compression damping tends to be more dependent on user preference and application.
For example, World Cup downhillers will typically favour a firmer compression setting to maximise chassis stability and maintain the bike’s dynamic geometry when riding at high speeds. Everyday trail riders on the other hand will likely prefer a lighter compression setting that provides more comfort and traction.
Furthermore, what compression setting you end up on will also depend on the model of fork you own, and the adjustments that are available to you.

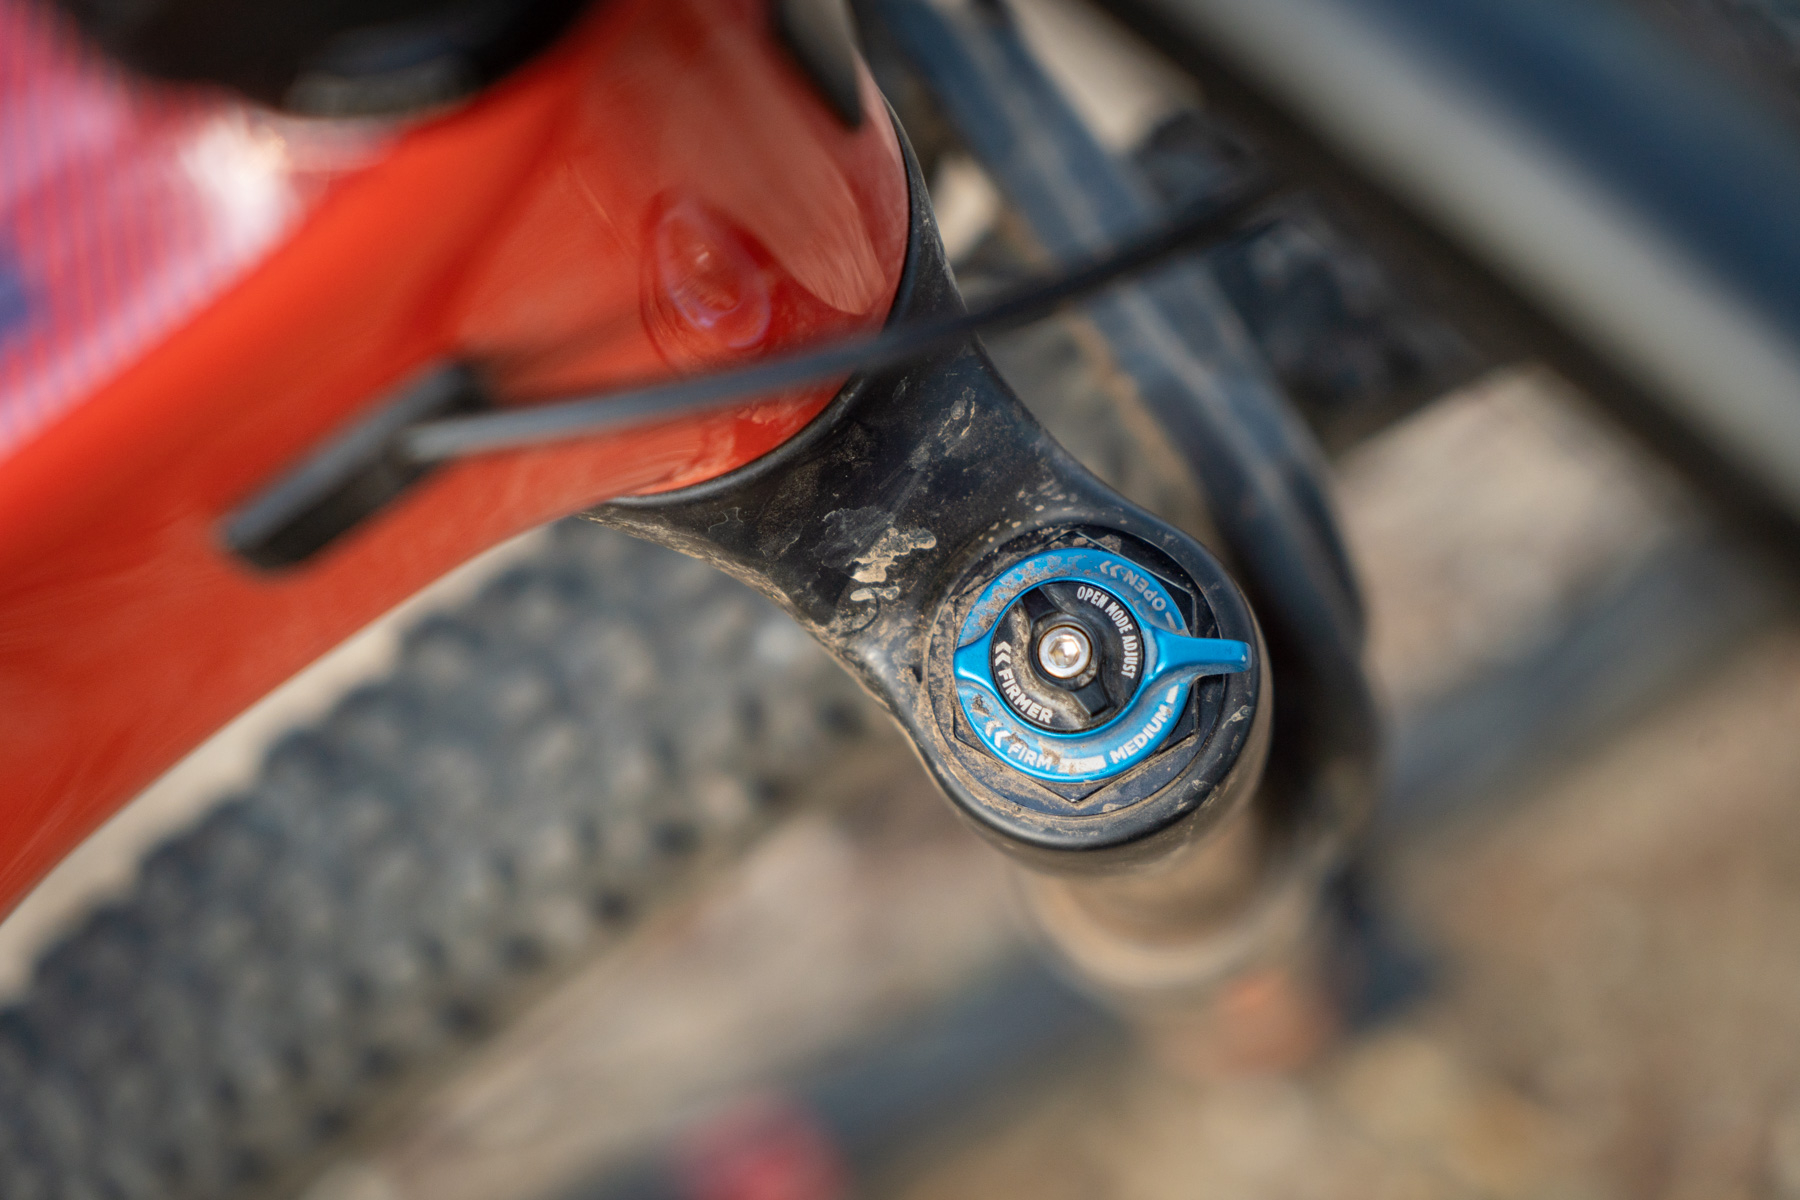
If you’ve got a GRIP or FIT4 damper, there’ll be a single blue lever that gives you access to three compression settings; Open, Medium and Firm. These are self-explanatory, and they make for simple but useful settings that you can adjust throughout each ride to tailor the fork to different surfaces.
For the most part you’ll want to set the compression lever to the Open position to provide maximum grip and bump absorption. If you’re riding a smoother flow trail however, selecting the Medium position will help to reduce dive under braking while keeping the fork higher in its travel when riding through banked corners. If you’re on the road or climbing a smooth section of trail, the Firm position will give you maximum support for out-of-the-saddle pedalling.
If your fork has a GRIP2 damper, things get a little more complicated. These forks feature two dials at the top of the right-hand fork leg; one for low-speed compression damping, and one for high-speed compression damping.
Now it’s worth clarifying here that high and low speed damping aren’t referring to riding speeds. Instead, these are solely dependent on the shaft speed of the damper.
Put simply, low-speed compression damping is controlling the fork during slow-speed movements. These are mostly caused by weight shifts from the rider when braking, pedalling, moving around the cockpit, or pushing the bike into a berm.
In comparison, high-speed compression damping is controlling the fork during high-speed impacts. These are typically more violent forces caused by the terrain, like a harsh square-edge hit or a heavy landing after a jump.

In each case, winding the dial clockwise will increase damping to slow down the fork under compression, making it feel firmer. Winding the dial anti-clockwise will decrease damping to speed up the fork during compression, making it feel softer.
To start off with, wind both dials clockwise all the way until they come to a stop. From here, Fox recommends winding the high-speed adjuster five clicks out from closed, and the low-speed adjuster 10 clicks out from closed. This will provide a good starting point for most riders, though as we’ll get onto shortly, there’s plenty of scope for tuning to find your ideal setup.
Taking notes
Once you’ve got your baseline suspension settings, make a new note in your phone and jot them all down. This will serve as your foundation point, so if someone messes around with your settings, or you end up in a confused mess having adjusted too many variables on a ride, you can easily get back to where you started.
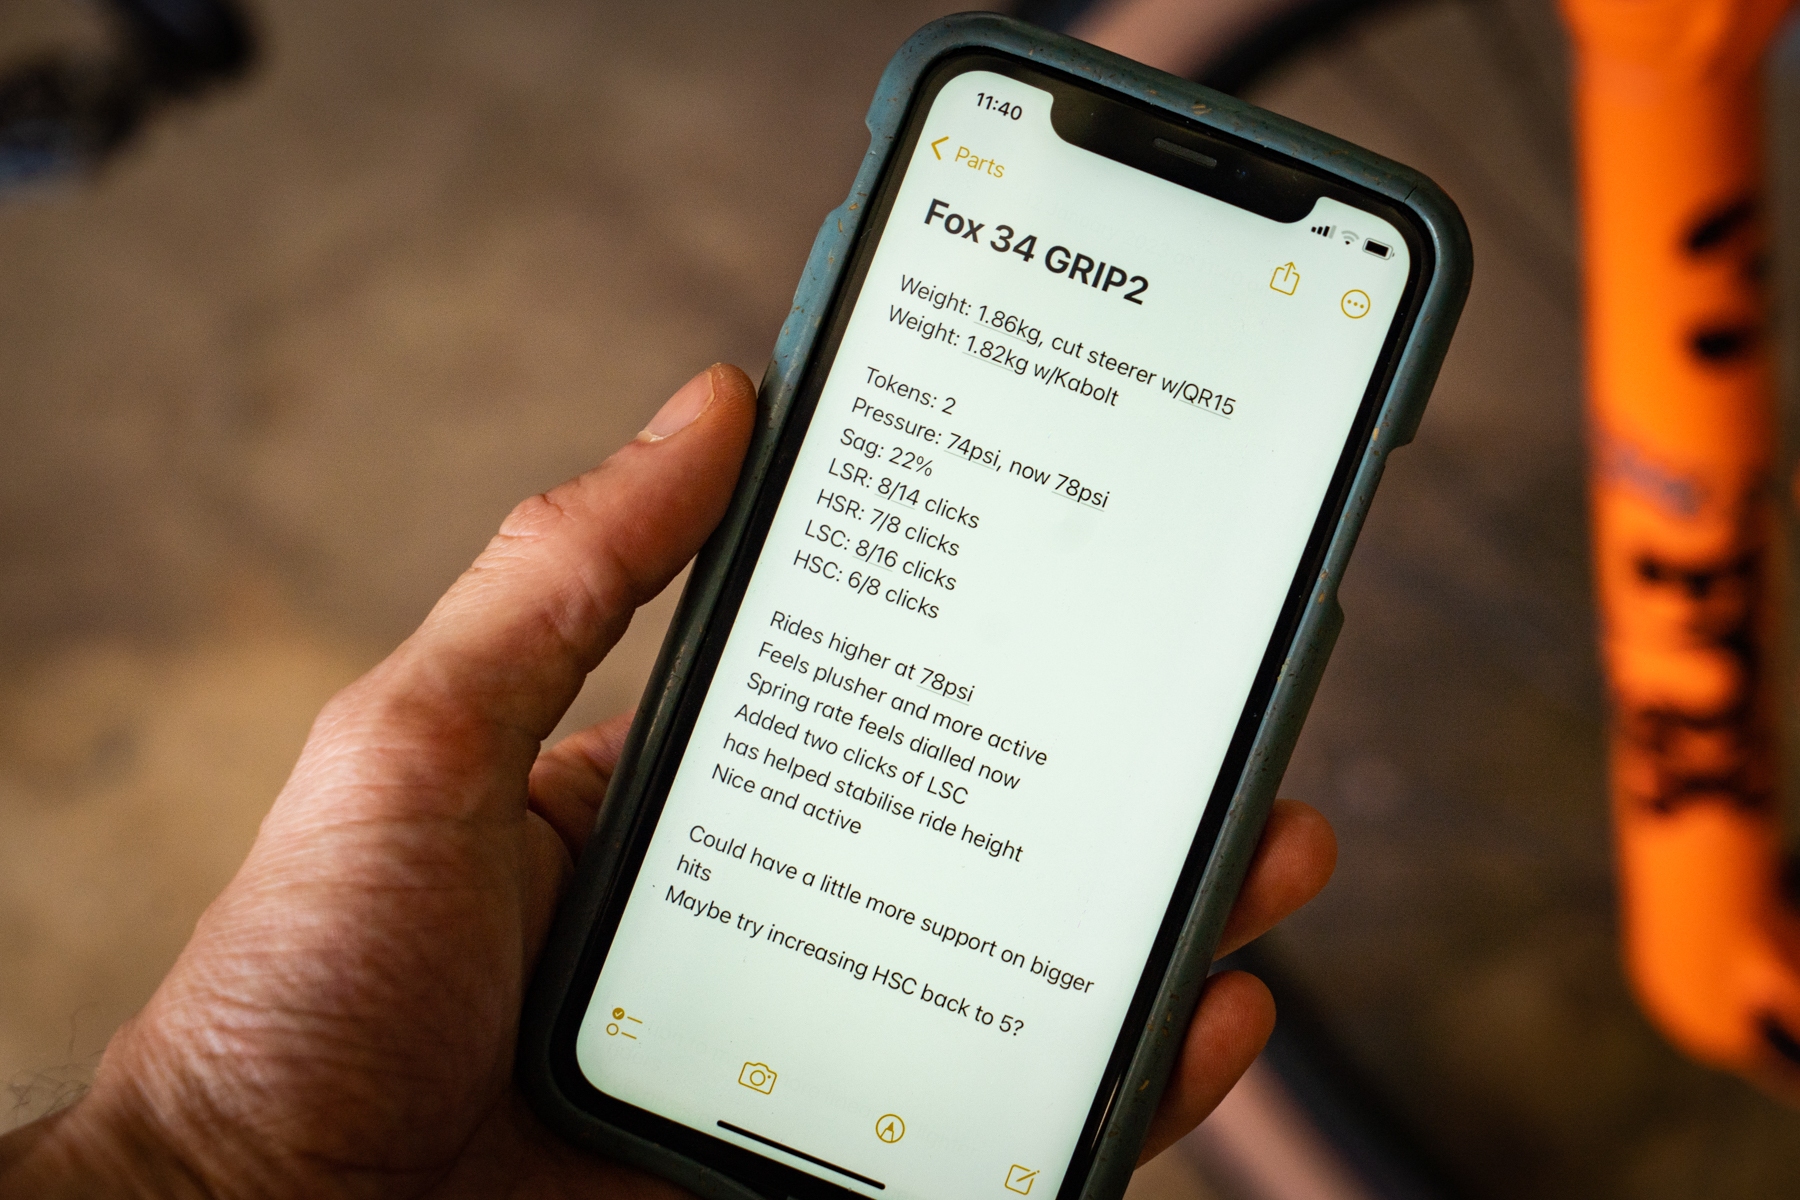
As well as noting down your air pressure and sag, write down how many volume spacers you have inside the fork. If you change pressures or add a volume spacer, put that in your notes.
Keep track of how many clicks you’ve made to the rebound and compression adjusters, while keeping an eye on where you’re at within the total range.
If you experience any notable quirks in suspension behaviour while you’re on a ride, whip out your phone and note them down. Perhaps you’ve bottomed out on a section that you don’t normally hit full travel on, or you’ve had an unusual front-wheel washout. This will serve as a reminder for when you’re back in the workshop, so you can make any adjustments as necessary.

Tuning & bracketing
While the standard Fox recommendations are a great place to start, it is worth spending some time playing around with the adjustments on your fork to get a better understanding of what they all do, and how they impact your bike’s overall ride quality.
The best way to do this is to seek out a familiar section of trail that has a good variety of features. You’re looking for a bit of everything, ideally a few small drops, bigger drops, rocks, roots, flat corners and banked corners. It doesn’t need to be long, around 200m in length is fine. It just needs to be easily repeatable, so that you can ride it over and over again.
Ride the trail with your baseline settings, then return to the start and pick a single damping adjustment to adjust. Turn the dial two clicks in one direction, then ride the trail again.
How did the fork feel the second time round? Did it feel better? If so, try turning the dial two more clicks in the same direction, and ride the trail again. Did it feel worse? Try turning the dial back one click and ride the trail again.

This process is called ‘bracketing’, and it’s a great way to isolate a single adjustment to determine exactly what it’s doing to the overall ride quality. It isn’t just for the damping controls either, as you can do bracketing with air pressure too. The same rule applies, so make sure you’re only making adjustments of 2-3 psi at a time.
Indeed this is the real key to the bracketing process. Be sure to only focus on one adjuster at a time, and only make small changes. Don’t try multiple things at once, because you’ll soon be confused. If that does happen though, you’ve always got your baseline settings that you can go back to.
Suspension servicing
Our last tip for dialling in your suspension, but perhaps one of the most important, is to routinely service your suspension. Because it doesn’t matter how fancy your fork is, or how much time you’ve spent tweaking those dials — if you’re not servicing it, then you’ll be missing out on the performance you paid for.
According to Fox, you want to service your fork every 125 hours of ride time, or once per year, whichever comes first. Now if you’re doing the math, you’ll realise that this number works out be an average of 2.4 hours of riding per week. What if you’re riding double that? Pretty simple, you’ll be wanting to get your suspension serviced twice per year.
It’s worth it too. Your suspension will feel plusher and more responsive after a service, and it’ll help to reduce to premature wear by ensuring the internals are properly lubricated.
After getting your fork back from a service, be sure to set it up with your baseline settings. Recheck the sag and pressure, take note of any changes you’ve made, and keep searching for that perfect setup – you’ll get there!